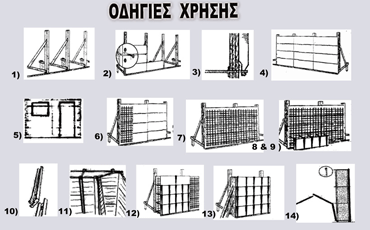
1) Fix the base board to vertical props with steel nails, following the line of the dwarf wall you are going to construct. Using common timber, prepare a framework identical to the one on the drawing and with the required length & height, according to the work you are going to execute, preferably set up on the external side. The distance between vertical centre sections must correspond to the length of the TroniC wooden shuttering boards you are going to use. Level the construction and start placing panels.
2) A nail near the edge is enough to keep up the panels. Make sure you left a gap between wooden panels, by placing a nail for instance, so that it is easier to remove the first spacer.
3) The board at the bottom should have the minimum thickness required to keep the fist panel slightly suspended and to let you hook propeller plates to the first row of spacers.
4) Keep up that way until the wall is completed.
5) Remember to leave openings, if there are any.
6) Place the steel reinforcement necessary for the boarding of the dwarf wall you are going to construct.
7) When you are done laying the steel reinforcement, place spacers between wooden shuttering boards with the right centre distance, chosen according to the mould’s height. 8) The centre distance you should keep when you place spacers depends mainly on the dwarf wall's height and thickness. After a while, depending on the room’s temperature, concrete begins to solidify and pressure in the mould gets lower. Hence, pressure in the mould depends on your speed while filling up the mould. Concreting is more dangerous if the mould is high, and thin (pillars, beams), because it fills up more quickly. For a temperature of 15 Celsius degrees, with solidified concrete and a filling speed not exceeding 2.5 metres per hour, safety regulations require that the centre distances displayed in the table below follow the height of the dwarf wall you are constructing. In every panel, the first spacer should be placed near the edge.
9) After having placed the spacers, place the plates and panels of the front wood casing.
10) When placed, cast plates (elica) become joint in the hole of every spacer.
11) Reinforce the angles using an extremely stable system. They are the weakest parts of the mould.
12) Keep up the construction of the entire dwarf wall, making sure that the joining of cast place (elica) plates and spacers is proper.
13) After having covered the finishing with wooden boards and beams placed on the soil, pour the concrete with extreme caution, especially when filling the first part of the mould.
14) After the moulding and once the concrete is stabilized, cast off the mould as quickly as possible. When you take the first wedge out, it will be easier to free the cast plates (elica) and release the panels.

 Ελληνικά
 Српски језик
 Русский
 Tourkish